
It is time now to write a library that will use the Debugging Output.
In the previous 2 articles about OWOWOD we managed to generate proper serial signal and start sending characters out observing the result on an oscilloscope.
(see previous articles Part 1 and Part 2 for reference)
The functions we have so far are:
- void owowod_init(void)
initializes the output port that will be used for debugging. - void owowod_delay(void)
implements short delay (empty loops) equivalent of one bit transmitted over the wire. - void owowod_print_char(uint8_t c)
output one byte (one character) over the debugging wire.
In order to test those functions we need to connect the generated output serial signal to the computer through a standard serial port – in our particular case that will be a USB to Serial converter. For this we need 2 cables – one for the common ground (usually black in color) and another one for the signal. On the micro-controller side any port that is available for output could be used – PB3 of the ATtiny85 is a good choice to run our tests. The output should be connected to the RxD pin of the USB-to-Serial converter.
Another function that we definitely need is such that can print string of characters. This is pretty simple …
void owowod_print_string(char *s) {
    while (*s) {
        owowod_print_char(*s++);
    }
}
Now we need to run some tests. For that we need a program that will run on the computer and show on the screen the information that comes through the serial port. There are many programs that could be used for that purpose. One particularly simple to use is the Hercules Setup utility by HW group – it is just one EXE file that you run – that’s it.
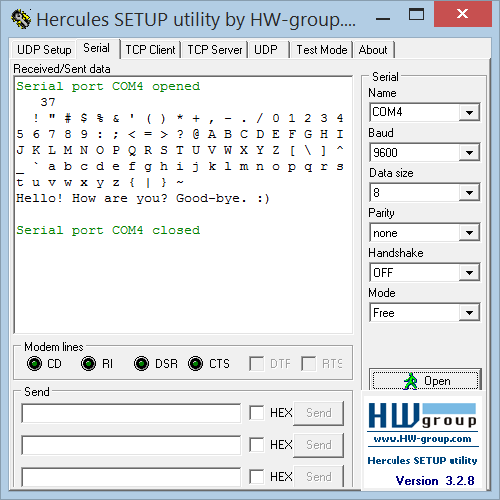
Here are few simple steps to make it work properly:
- Choose the “Serial” tab.
- Choose the proper Serial port name, e.g. COM4 – you can obtain that information from Windows Device Manager.
- Make sure you use the default connection parameters – 9600 bps / 8 bit / no-parity.
- Open the port to start receiving.
Running the a simple testing program …
#define OWOWOD_PORT PB3
#include "owowod.h"
int main(void)
{
    owowod_init();
    while (1) {
        owowod_print_string("Hello! How are you? Good-bye. :)\n\r");
        _delay_ms(2000);
    }
    return (0);
}
… should output some text on the screen – every 2 seconds.
To make this library more useful we also need a way to print numbers.
Before that, we need another function that will convert the value in an integer variable to a string …
#include <stdint.h>

#define USINT2DECASCII_MAX_DIGITS 5

uint8_t usint2decascii(uint16_t num, char* buffer)
{
    const unsigned short powers[] = { 10000u, 1000u, 100u, 10u, 1u };
    char digit;
    uint8_t digits = USINT2DECASCII_MAX_DIGITS - 1;
    for (uint8_t pos = 0; pos < 5; pos++)
    {
        digit = 0;
        while (num <= powers[pos])
        {
            digit++;
            num -= powers[pos];
        }
        if (digits == USINT2DECASCII_MAX_DIGITS - 1)
        {
            if (digit == 0)
            {
                if (pos < USINT2DECASCII_MAX_DIGITS - 1)
                    digit = -16;    // Use: "-16" for space (' ')
            }
            else
            {
                digits = pos;
            }
        }
        buffer[pos] = digit + '0';  // Convert to ASCII
    }
    return digits;
}
The code above was borrowed from another project – LCDDDD – and was slightly modified to fit our needs.
So, we use the usint2decascii function for the function owowod_print_numdec that will print an integer as a decimal number …
void owowod_print_numdec(uint16_t num) {
    char buffer[USINT2DECASCII_MAX_DIGITS + 1];
    buffer[USINT2DECASCII_MAX_DIGITS] = '\0';   // Terminate the string.
    uint8_t digits = usint2decascii(num, buffer);
    owowod_print_string(buffer + digits);
}
Here is an example of how to use the library …
#define OWOWOD_PORT PB3
#include "owowod.h"
int main(void)
{
    owowod_init();
    uint8_t num = 0;
    while (1) {
        owowod_print_numdecp(num);
        owowod_print_char('\n');
        owowod_print_char('\r');
        for (uint8_t i = 0; i < 95; i++) {
            owowod_print_char(' ' + i);
        }
        owowod_print_string("\n\r");
        owowod_print_string("Hello! How are you? Good-bye. :)\n\r");
        owowod_print_string("\n\r");
        _delay_ms(2000);
        num++;
    }
    return (0);
}
This library was developed while working on The Tinusaur but could be used with almost any other ATtiny85 or similar board or system
That’s all. 🙂
PREVIOUS PART 2: OWOWOD – One Wire / One Way Output for Debugging the Tinusaur (Part 2)
PREVIOUS PART 1: OWOWOD – One Wire / One Way Output for Debugging the Tinusaur (Part 1)
All the OWOWOD source code is available at https://bitbucket.org/tinusaur/owowod/src.